Patchwork piecing with a quarter inch seam allowance

When I made my first quilt, I didn't know that patchwork quilt patterns were designed to be sewn with a 1/4 inch seam allowance. I used what had, up to that point, been my sewing standard of a 3/8 inch seam allowance which meant that my quilt came out smaller than I anticipated.

An accurate and consistent seam allowance may seem tedious at first, but as you get further along with your quilt top and start connecting those rows to each other into blocks, it'll mean that it's easier to line up your points (those spots where multiple patches come together at the corners).

There are a couple options for keeping your seam allowance consistent:

  • Marking a 1/4 inch seam allowance on your machine

  • Using a 1/4 patchwork foot

Marking a 1/4 seam allowance on your machine

IMG_6084

Right this very moment, you can grab a ruler and some masking tape (I keep a roll of washi tape in with my sewing supplies) and mark a 1/4 inch seam allowance on your machine.

IMG_6085

A quarter inch on my machine lands on the feed dogs (those little metal teeth that help pull your fabric through)  so putting that masking tape on where it won't get in the way of sewing is tricky. My tape isn't quite straight but it's better than nothing.

Using a 1/4 inch patchwork foot

IMG_6086

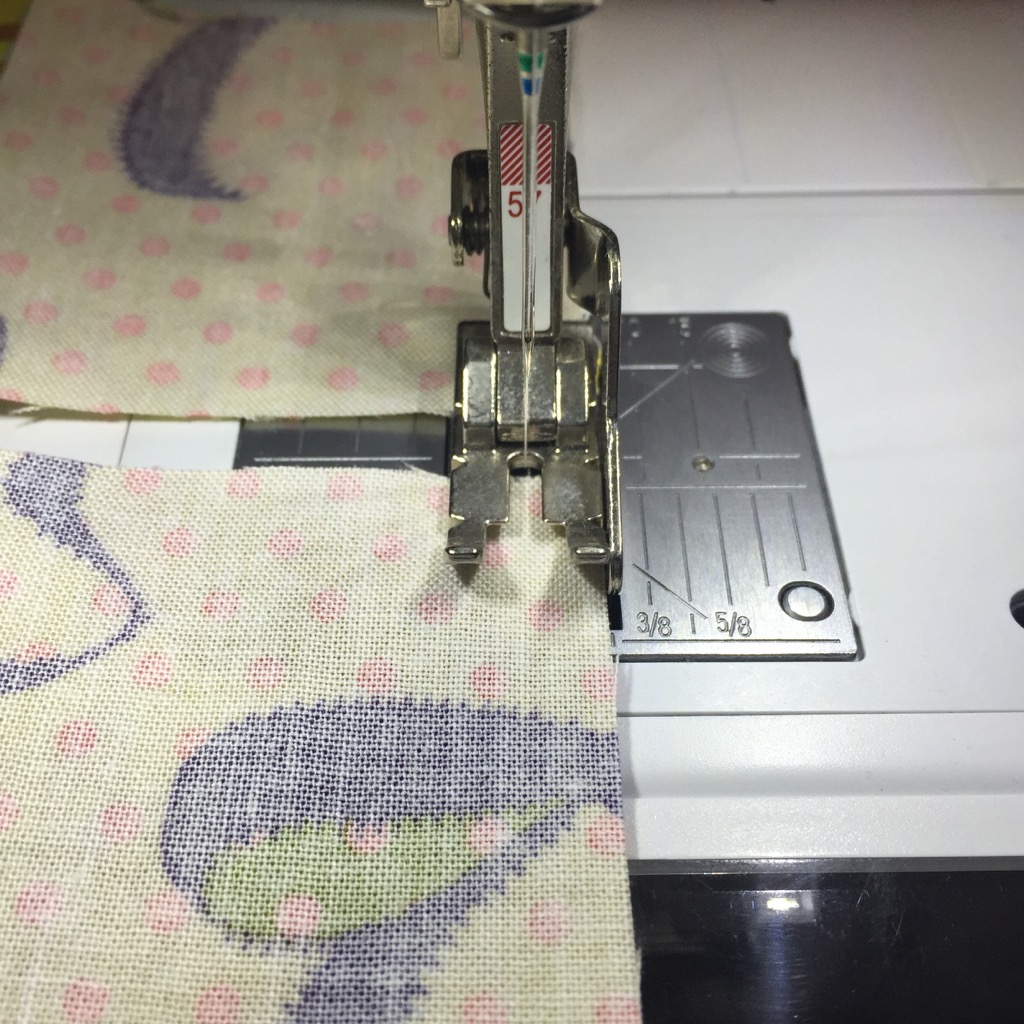
My preference is to use a special foot on my machine. I'm currently using a Bernina machine with a #57 foot which is described as a "patchwork foot with guide". For my old Singer, I had a generic patchwork foot with the guide that I found by asking about it at my local fabric store.

IMG_6090

With the patchwork foot with guide, you just pop your fabric in so that the right side of the fabric touches the left side of the guide and you sew.

IMG_6091

No backstitching needed when you're sewing all those patches together. I didn't know that when I made my first quilt and backstitching had been another one of those things I was so into the habit of doing by default.

IMG_6093

Since you're not backstitching, you can chain piece. As you finish sewing one pair of patches together, just pop in your next pair and keep going. When you've got a bunch done, go back and cut the thread between each pair. I find a small pair of embroidery scissors is easier to use here than a big pair of fabric sheers.

$13.44
GINGHER
Buy on Amazon
IMG_6092

How to sew a rice bag

Here's how to make a rice bag. You'll need to know how to use your sewing machine for this project. If you are not familiar with your sewing machine, I recommend a) reading the manual and b) taking an in person class at a fabric store near you. Once you get started sewing, keep sewing on a regular basis or you'll forget and have to start back at reading the manual.

If you're already familiar with your sewing machine, this is a quick and easy project. It took me 20 minutes to make a bunch of rice bags.

How to sew a rice bag Read more at: How to sew a rice bag | carrie actually

Cut your fabric to 5x5 inches. I used scraps leftover from another recent project I did but you can also buy precut 5x5 inch "charm squares". I did not prewash my fabric for this project.

How to sew a rice bag Read more at: How to sew a rice bag | carrie actually

Place two squares right sides together. Start stitching about 1 inch from the bottom right corner. Backstitch then stitch around 3 sides of your square.

How to sew a rice bag Read more at: How to sew a rice bag | carrie actually

Turn your fourth corner and then stitch 1 more inch and backstitch. You want to have about a 3 inch opening on one side of your square.

How to sew a rice bag Read more at: How to sew a rice bag | carrie actually

Turn your bag right side out and fill with half a cup of plain uncooked rice.

How to sew a rice bag Read more at: How to sew a rice bag | carrie actually

Fold the raw edges in along your 3 inch opening and pin. I like to put one pin at each end of the opening and one in the middle.

How to sew a rice bag Read more at: How to sew a rice bag | carrie actually

At this point I switch to a zipper foot on my sewing machine and move my needle to the far right position. Stitch all along the side of your square with the opening to keep it shut. Backstitch at the beginning and the end.

How to sew a rice bag Read more at: How to sew a rice bag | carrie actually

That's it. I think contrast stitching is really fun so I picked a thread that matched the mermaids tails, but I could have picked one that matched the dark blue background so it'd be almost invisible.

How to sew a rice bag Read more at: How to sew a rice bag | carrie actually

Supplies (I did not buy anything new for this project, just used what I already had from other projects but if you see something you like): Dear Stella Seaworthy Mermaid fabricAurifil Jade threadBernina 350PE sewing machineOlfa ergonomic rotary cutterOfla cutting matOmnigrid quilter's rulerGypsy GripperClover flower pins