Quilty New Year's Resolutions, The Quilty Math Workbook, and What I Have in Store for 2016

Pretty much every year, my New Year's resolution is a variation of I’m not going to start any new craft projects until I finish all the ones I already started.

Every year I fail at keeping that resolution.

This year my resolution is to be way more strategic about the projects I do start.

Have a plan. Buy only the right amount of the right supplies. Stop spending money on supplies that I’m not going to use and stop having to figure out where and how to store those supplies I’m not going to use.

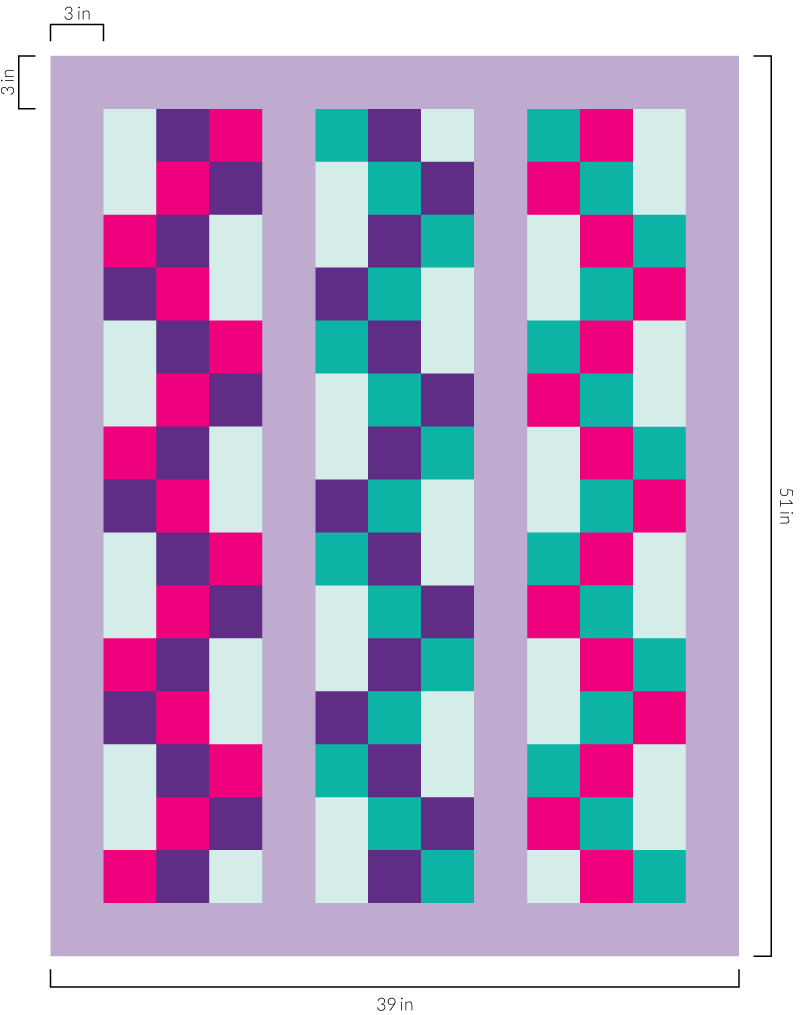
The Quilty Math Workbook is the key to figuring out exactly how much fabric and batting I need for each of my current and future quilt projects.

The Quilty Math Workbook consolidates all the information I previously had to look up over and over again for figuring out what size my quilt pieces need to be, how much seam allowance I need to add to each of those pieces, and how much yardage or how many fat quarters I need to be able to cut out all of those pieces.

It’s perfect for finishing current projects but calculating how much fabric I need for sashing and borders, what size batting I need to purchase for my quilt top, the most efficient way to piece together a backing and how much fabric I need to buy to do that, and how much fabric I need to purchase for binding.

It drives me crazy when I buy someone else’s pattern or find a lovely free pattern online and it doesn’t specify how much fabric I need to make the quilt. A couple years ago, before I created the Quilty Math Workbook, I asked a quilt designer how much fabric I needed to buy to make her sampler quilt that was designed to be made with scraps (which I just didn’t have enough of that I liked), I ended up buying more than twice the amount of fabric I needed. And I don’t really want to make two of that quilt. Especially considering I still haven’t finished the first one. The Quilty Math Workbook can be used to figure out how much fabric you need to buy for any geometric quilt pattern composed of squares, rectangles, and triangles in whatever number and combination of fabrics you can imagine.

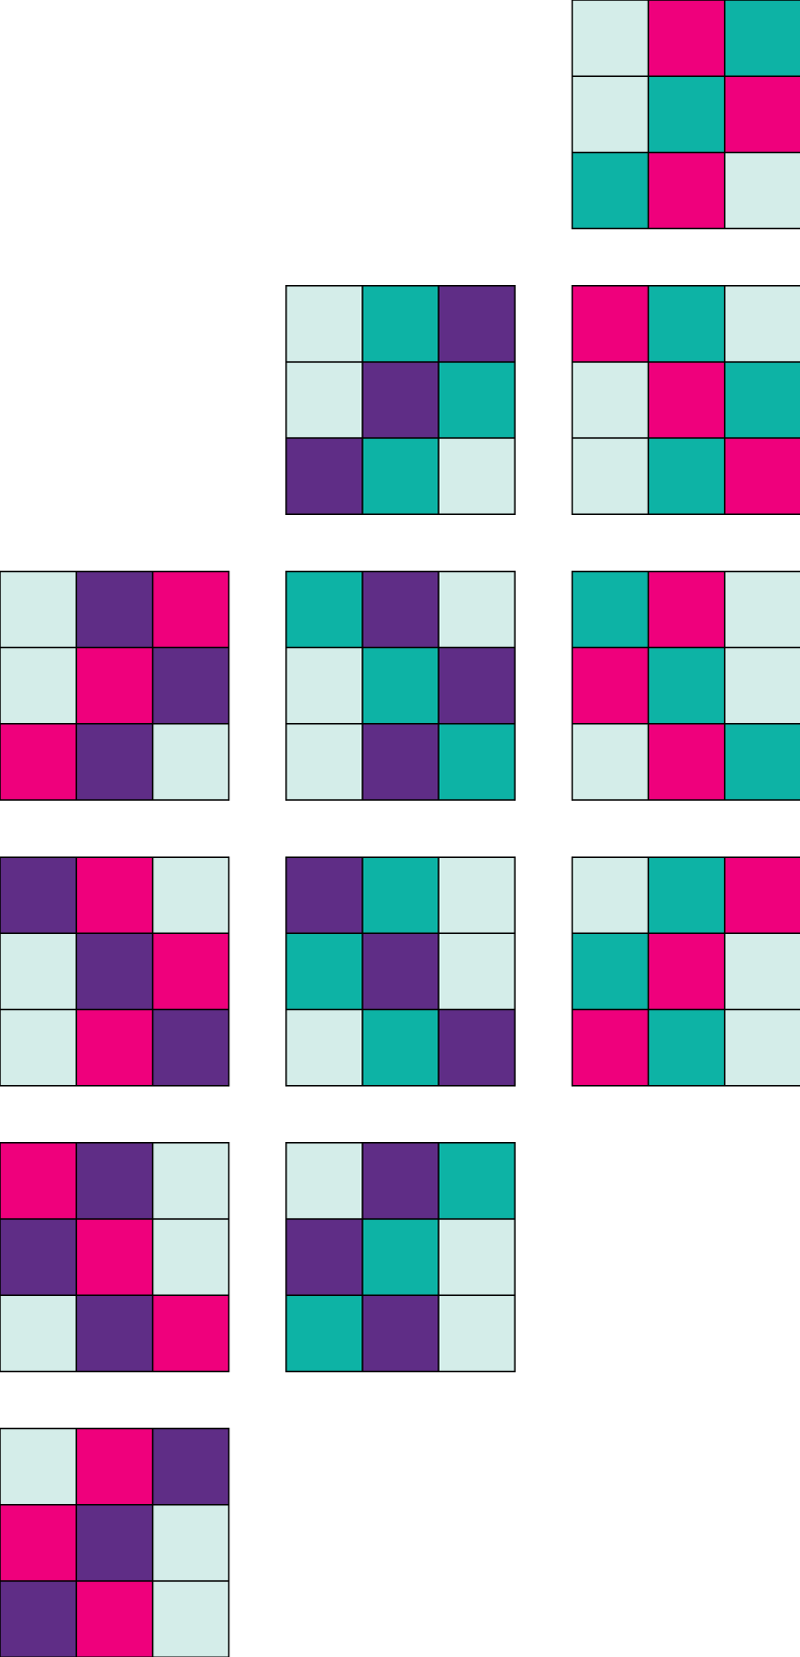
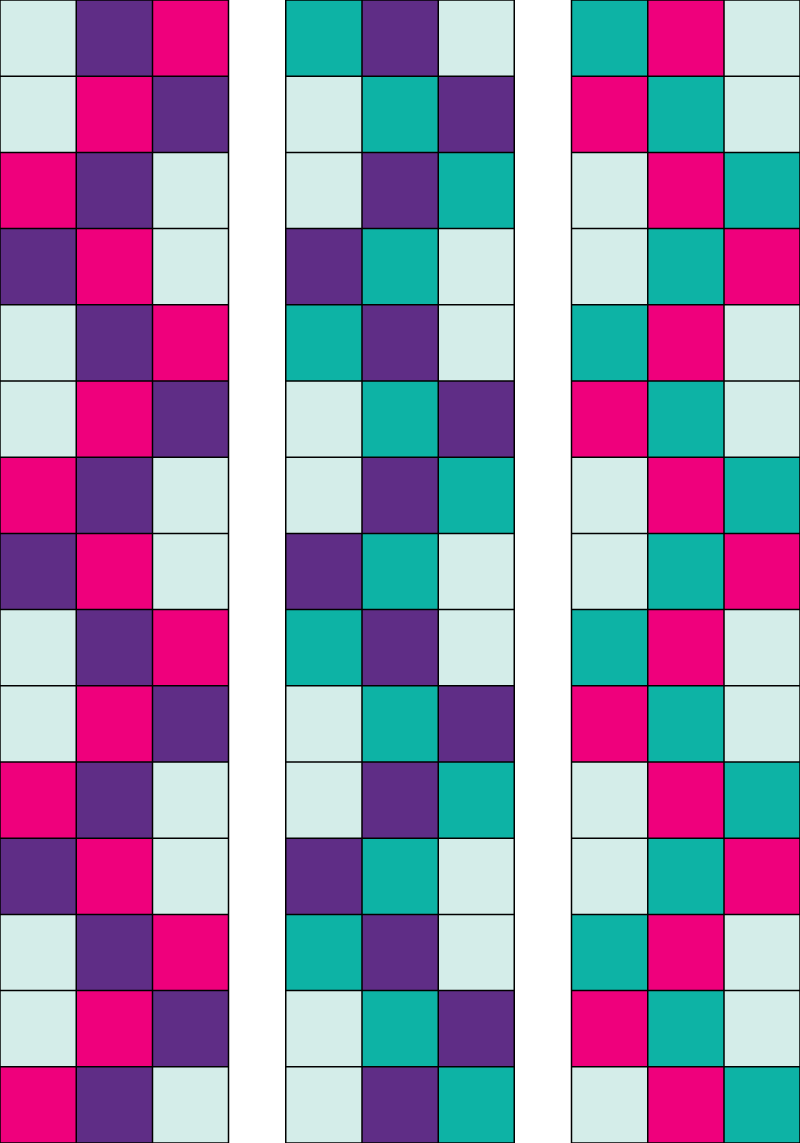
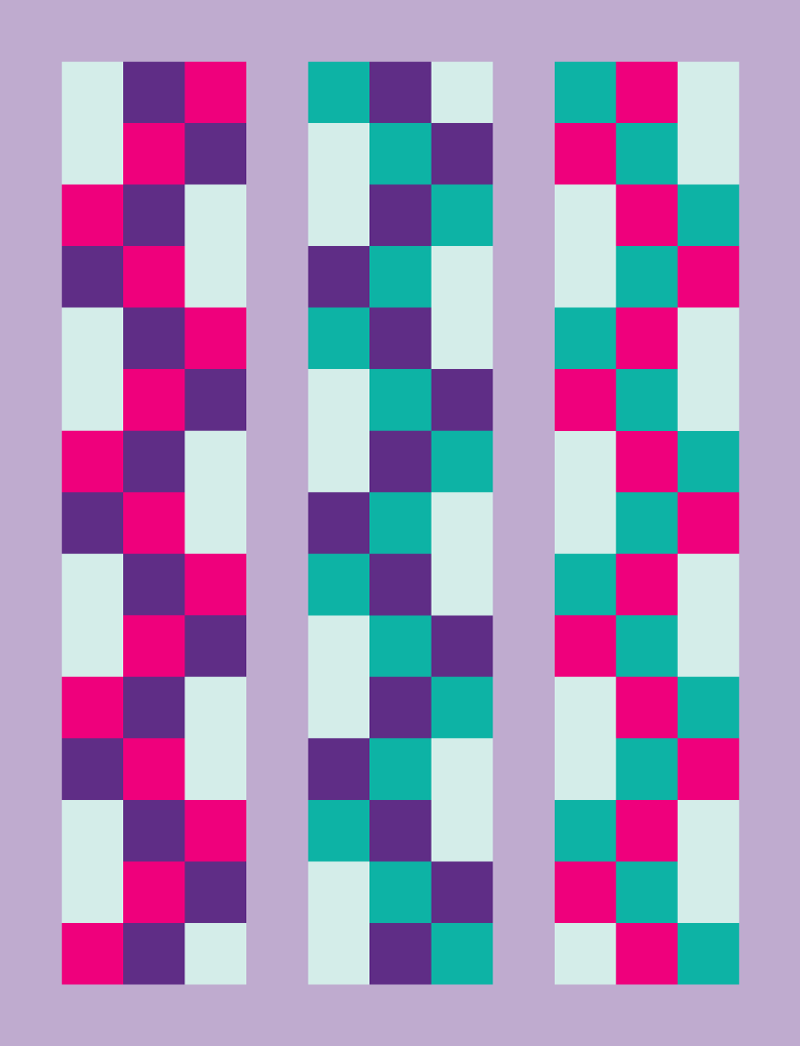
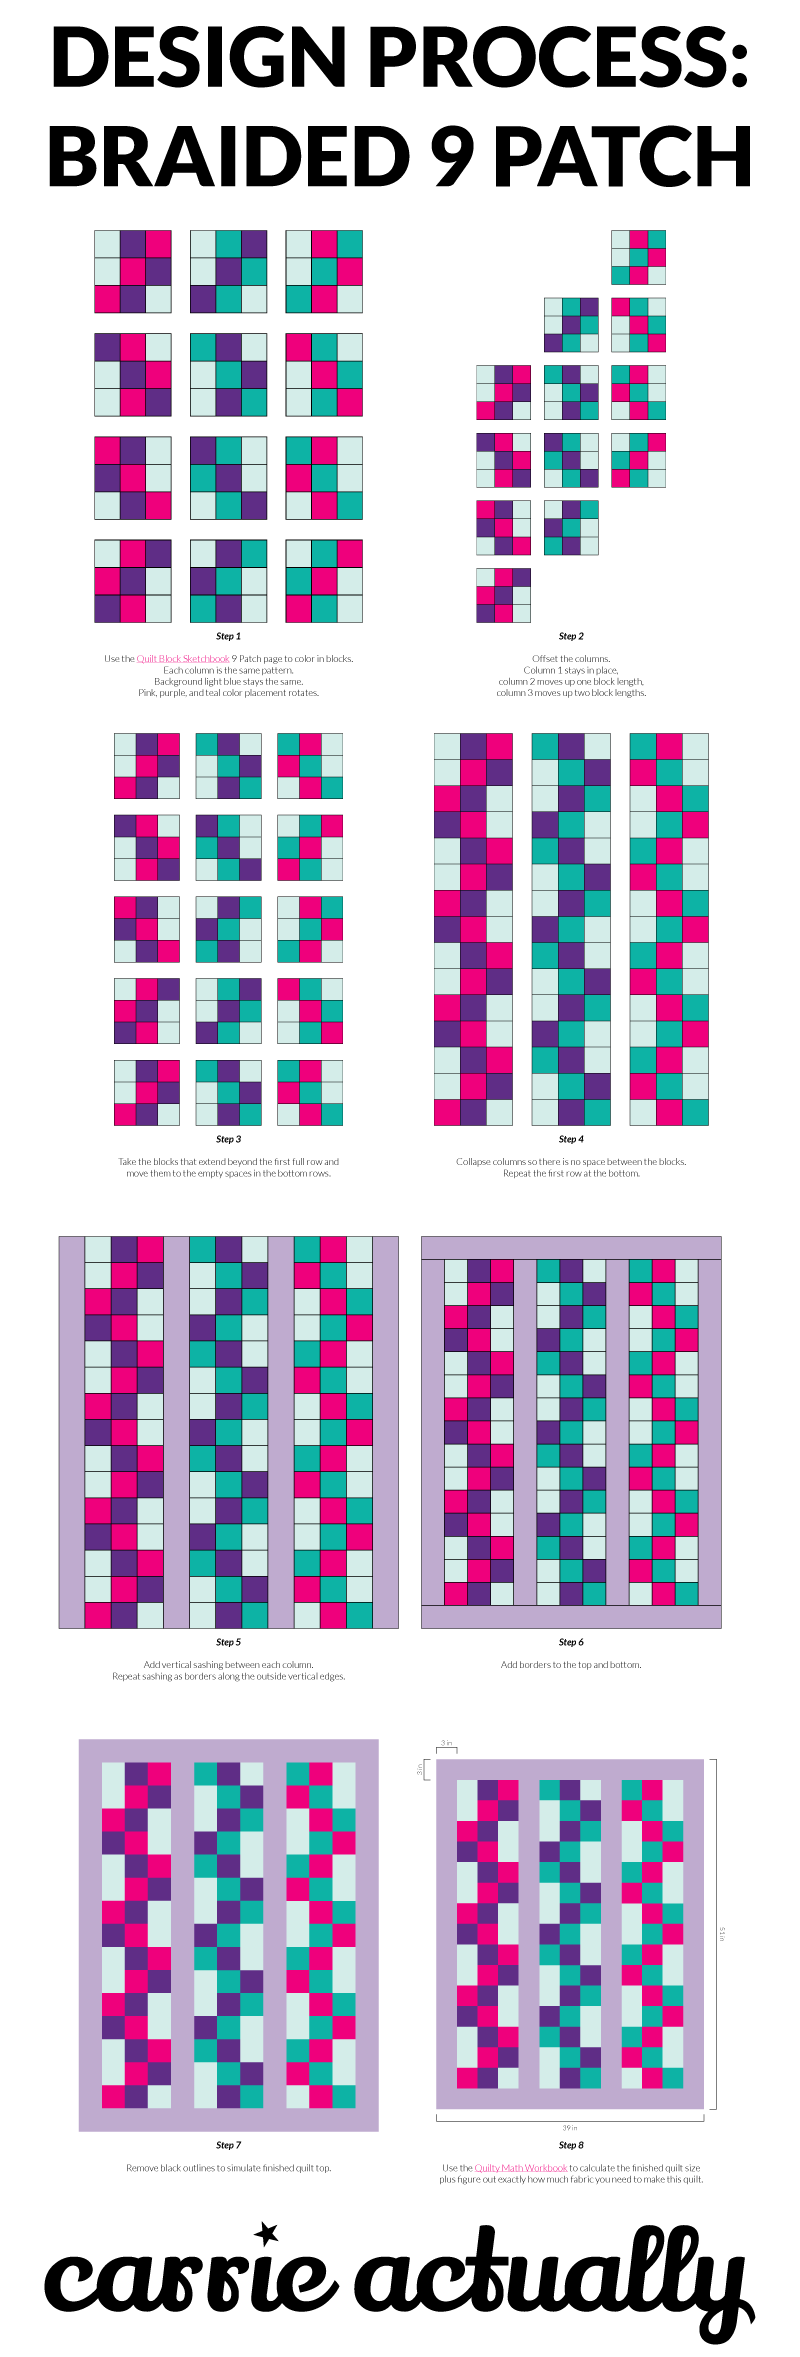
The Quilty Math Workbook also has graph paper worksheets I created to help me think through the process of creating block designs, arranging those blocks into rows that I can sew together, and adding sashing and borders as desired.

I’ll also be using the Quilty Math Workbook to help me develop my next ebook.

Announcing my next product: The Half and Half Quilt Pattern + Ebook

My next product, which you can expect to be released in early 2016, is going to be all about half square triangles.

There are a few key points that make this not just your average half square triangle quilt pattern.

All of the half square triangle units I’ll be working with will be half white and half color + print. I can spend hours arranging my fabric into pairs to be sewn together but somehow I always get them mixed up myself or my toddler grabs a handful so he can “help”. If I always sew together white and color when making my half square triangle units, it’s really easy to get every single one right the first time.

I’ve culled through thousands of classic quilt blocks to select and adapt blocks to create a gallery of appealing designs that are composed exclusively of these easy to sew half square triangle units that are half white and half color. The gallery will include 130 of the prettiest block designs you can create with my half and half units and nothing else. They’ll all use the same units and same amount of fabric so it’s easy to pick and choose. It’s also easy to change your mind and keep going with your quilt.

In the spirit of using fabric as efficiently as possible so you’re not spending a lot of money on future scraps, the master pattern will be designed so you can quickly cut all of the pieces for your half square triangle blocks from fat quarters with minimal waste. After accounting for selvedges on your fat quarters, you’ll be using 94% of the fat quarters in your half square triangle units. 

Scrappy Quilted Planner Cover for the Get To Work Book

My 2015 Emily Ley Simplified Planner died a horrible death back in September when my toddler pulled the front and back covers in different directions and destroyed the spiral binding. For 2016, I purchased Elise Blaha's Get To Work Book and when I saw this Quilted Planner Cover tutorial from Sew Fearless, I knew I had to adapt it to fit my new planner.

Quilted Planner Cover for the 2016 Get To Work Book + suggestions on how to adapt the size to fit any planner

Figuring out how to adapt Sew Fearless's tutorial so that the cover would fit my planner was the trickiest part.

For the width of my cover (laid out flat), I used the width of the planner pages x 2 + the thickness of the planner + 1 inch.

For the height of my planner cover, I used the height of the planner pages + 1 inch.

Quilted Planner Cover for the 2016 Get To Work Book + suggestions on how to adapt the size to fit any planner

I'm usually not the sort of quilter who uses scraps for my project but I had a lot of large scraps from the Lizzy House Cat Nap line of fabric so I decided to experiment with some improv piecing.

This part came out just okay in my opinion. I didn't really enjoy it. Evenly sized geometric shapes are my jam.

I pieced together my scraps so that they measured 18.5 inches wide by 10 inches high.

Quilted Planner Cover for the 2016 Get To Work Book + suggestions on how to adapt the size to fit any planner

I sandwiched my pieced fabric around a large scrap of Annie's Soft and Stable, basted around the edges, and quilted lots of straight, vertical lines. I started with one line down the middle and then made a few widely spaced lines and then went back and filled in with lots more narrowly spaced lines so that I wouldn't end up with any lumps.

Next I created the sleeves following Sew Fearless's tutorial (but adjusting the height for my planner). I used Pellon SF101 interfacing (which is the only thing I didn't have enough scraps of on hand for this project).

This part definitely reminded me of making book covers out of paper grocery bags for my text books back in elementary school.

I decided not to add any pockets as I never use planner pockets anyway. I prefer to paperclip any thing I need on a certain date to the appropriate page so I don't forget about it.

Quilted Planner Cover for the 2016 Get To Work Book + suggestions on how to adapt the size to fit any planner

Lastly, I made some scrappy binding and covered all of the edges. For this part, I made double fold straight grain binding (this is my favorite binding making tutorial) and machine stitched both sides following this machine binding tutorial.

Happy planning!


Braided 9 Patch Design Process Tutorial

In this post, I'm going to show you step by step how I start with the Quilt Block Sketchbook to color in some simple squares and turn those squares into a complete quilt top design.

Step 1

Use the Quilt Block Sketchbook 9 Patch page to color in blocks. Each column is the same pattern. Background light blue stays the same. Pink, purple, and teal color placement rotates.

Step by step quilt top design process - Braided 9 Patch - Use the Quilt Block Sketchbook 9 Patch page to color in blocks. Each column is the same pattern. Background light blue stays the same. Pink, purple, and teal color pl…

Step 2

Offset the columns. Column 1 stays in place, column 2 moves up one block length, column 3 moves up two block lengths.

Step by step quilt top design process - Braided 9 Patch - Offset the columns. Column 1 stays in place, column 2 moves up one block length, column 3 moves up two block lengths.

Step 3

Take the blocks that extend beyond the first full row and move them to the empty spaces in the bottom rows.

Step by step quilt top design process - Braided 9 Patch - Take the blocks that extend beyond the first full row and move them to the empty spaces in the bottom rows.

Step 4

Collapse columns so there is no space between the blocks. Repeat the first row at the bottom.

Step by step quilt top design process - Braided 9 Patch - Collapse columns so there is no space between the blocks. Repeat the first row at the bottom.

Step 5

Add vertical sashing between each column. Repeat sashing as borders along the outside vertical edges.

Step by step quilt top design process - Braided 9 Patch - Add vertical sashing between each column. Repeat sashing as borders along the outside vertical edges

Step 6

Add borders to the top and bottom.

Step by step quilt top design process - Braided 9 Patch - Add borders to the top and bottom.

Step 7

Remove black outlines to simulate finished quilt top.

Step by step quilt top design process - Braided 9 Patch - Remove black outlines to simulate finished quilt top.

Step 8

Use the Quilty Math Workbook to calculate the finished quilt size plus figure out exactly how much fabric you need to make this quilt.

Step by step quilt top design process - Braided 9 Patch - Use the Quilty Math Workbook to calculate the finished quilt size plus figure out exactly how much fabric you need to make this quilt.

Pin this tutorial!

Step by step quilt top design process - Braided 9 Patch